

On Server Box
1. install CopSSH
Be sure to install it to a folder without space in its name. I used C:\SSH. Then just press next until it finishes.
2. install MSysGit
 d. Goto C:\SSH\home\git\.ssh folder, create a file named authorized_keys. Open this file using wordpad.
Be sure to install it to a folder without space in its name. I used C:\Git. The default values suits me well.
3. Config CopSSH
a. I would like to user a separate user for git access. So create a user from command line
net user git userspassword /add
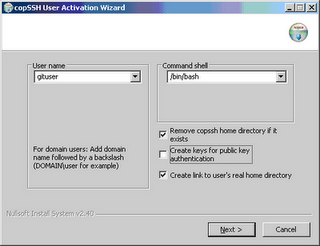
b. Then, goto “Start | Programs | Copssh | 01. Activate a user” to activate the user.
Note, you should clear the 2nd checkbox, we’ll generate keys later.
c. goto C:\SSH\etc folder, open the sshd_config file using wordpad (ornotepad2), don’t use notepad, it’s a UNIX format file. Remove the leading # character for item “PasswordAuthentication” and change the “yes” to “no”. Also you can review the rest of the config file and change if necessary. For me, most of the default settings works fine.
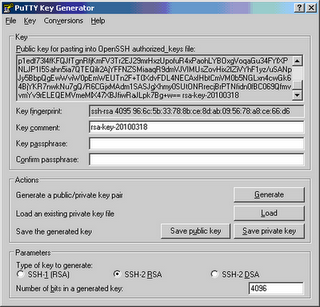
e. Install/extract Putty if you have not. Invoke PUTTYGEN.EXE to generate a pair of keys:
I used a 4096 bit SSH2 key. Save the private key to a folder and remember it. We’ll use it later. Copy the content in the text box labelled with “Public key for pasting….” to the wordpad window you opened at step d, and save it, close the wordpad.
f. (Re)Start SSH Server. You can either reboot your PC, or use below command line:
net stop opensshserver
net start opensshserver
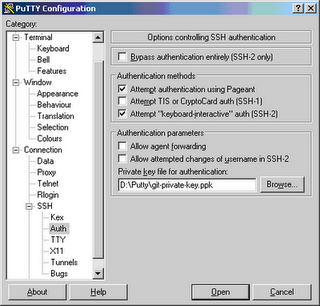
g. Now it’s ready to test SSH connection. Invoke Putty.EXE, put localhost as host name, if you changed port in step c, don’t forget to change it here. Navigate to Connection/SSH/Auth node, press the “Browse” button to select the private file you generated and stored in step e, as shown below:
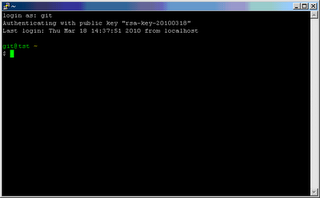
You can save the settings to save you some typing next time. Google it if you don’t know how. Now press “Open” button, you will see a warning window on first connection, press “Yes” to accept the key. Then a block terminal window pops up, with prompt “login as:”, input “git” (without quote), and you should be prompted for a key-phrase if you set it when you saved the private key. Note, this is not the password of the git user you created during step a!!!. And with some luck (which you don’t need if you know what you are doing), you should see some window similar to this:
If you’ve made it, congratulations, the hardest part is behind you. If you don’t see it, then please review carefully what you have missed.
h. invoke a command window if you have not (where have you executed those “net xxx” commands?), and type
cd /d %USERPROFILE%
echo export HOME=/c/SSH/home/git > .bashrc
i. goto C:\SSH\home\git folder, open the .bashrc file (yes, the same name as in the above line). Insert below line to the first line: (AGAIN, THIS IS A UNIX FILE!)
export PATH=/cygdrive/c/Git/bin:/cygdrive/c/Git/libexec/git-core:$PATH
NOTE, above “export PATH=…” must be in the same line!
4. setup a Git repository.
goto C:\SSH\home\git and make a folder named test.git. Right click the folder and select “Git Bash” from context menu. (What? You did not choose the explorer integration? Goto start menu, find Git|Git Bash, and use command line to goto this folder). Then input below lines:
$ git init –bare
Initialized empty Git repository in C:/SSH/home/git/test.git/
Now the server setup is DONE. You might need a cup of coffee of a cake to ease your nerve.
Special notes no 2003 server. It seems the sshd will experience error if the user account used to login is not a member of administrator (thanks for the comment from Raphael). So if you experience problem, try to add the user’s account to administrator group and try again.
On Client PC
1. Install MSysGit, as on server. You can choose any folder you like (better a folder without space in it’s path).
2. Test connection, using Putty. Change the host name and port as in your environment. Don’t forget the Connection | SSH | Auth node setting. Copy the private key file to client machine and point the file in this node. Then press “Open” button, you should find it similar to what you have experienced at step g above. But this time, after you logged in, you are actually logged in to another computer! After you logged in, type “git”, and see if you have the familiar git help screen before you. If you see
-bash: git: command not found
then please check if you have step i done correctly.
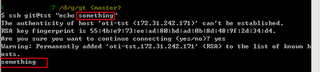
3. Opne a command window, type
input “yes” to accept the remote key. Then you should get an echo “something”
 6. Now we are ready to clone the empty project we created at server
$ git clone ssh://git@tst/SSH/home/git/test.git
Initialized empty Git repository in D:/g/gt/test/.git/
warning: You appear to have cloned an empty repository.
Now you can make some change and push it back
Counting objects: 3, done.
Writing objects: 100% (3/3), 236 bytes, done.
Total 3 (delta 0), reused 0 (delta 0)
To ssh://git@oti-tst/SSH/home/git/test.git
* [new branch] master -> master
Congratulations, you can clone and push back. It’s not as hard as it sounds, after all 😀
6. Now we are ready to clone the empty project we created at server
$ git clone ssh://git@tst/SSH/home/git/test.git
Initialized empty Git repository in D:/g/gt/test/.git/
warning: You appear to have cloned an empty repository.
Now you can make some change and push it back
Counting objects: 3, done.
Writing objects: 100% (3/3), 236 bytes, done.
Total 3 (delta 0), reused 0 (delta 0)
To ssh://git@oti-tst/SSH/home/git/test.git
* [new branch] master -> master
Congratulations, you can clone and push back. It’s not as hard as it sounds, after all 😀
cd /d %USERPROFILE%
md .ssh
Then use windows explorer to open this folder. create a files (id_rsa.pub) if they don’t exist.
4. Fire up PuttyGen.EXE again, load the private key you used at step 2. Paste the content of the text box to file id_ras.pub, and use menu “Conversions | Export OpenSSH key” to save to the folder you created at step 3, in name “id_rsa”. Now the folder %USERPROFILE”\.ssh should have at least 2 files: id_rsa and id_rsa.pub
5. create a empty folder and invoke the Git Bash and navigate to that folder. Type
ssh git@your.remote.host “echo something”
$cd test
$vim readme.txt
$git add readme.txt
$git commit -a -m “first commit”
[master (root-commit) f216dfe] first commit
1 files changed, 1 insertions(+), 0 deletions(-)
create mode 100644 readme.txt
$ git push origin master
Setting up multiple accounts
I just realized that I forgot the part on how to make your repository accessible to multiple users. It’s simple once you have gone through above steps: adding another user is just to generate another key-pair, and put the public-key into the authorized-key file. That’s all. Then the new user can access your repository. (just follow the client setup, no other server settings needs to be changed).
I know a better way is to use Gitosis, but I’m not able to run it without cygwin yet 🙁