

本周Windows Azure Team发布了新的开发门户和1.3版本的SDK。新版SDK中有许多非常酷的特性,其中之一便是以远程桌面访问正在运行的Windows Azure虚拟机,该特性也是我之前非常期待的的一个新功能。
配置远程桌面访问
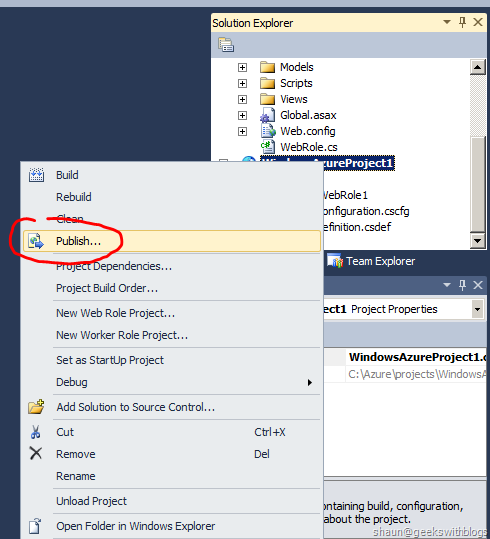
为Windows Azure服务启用远程桌面访问是非常简单的。首先,使用Visual Studio创建一个新的Windows Azure项目,在这个例子中我仅创建一个常规的没有任何修改的MVC2 web role。 然后在解决方案窗口右击该Windows Azure项目选择”Publish”。
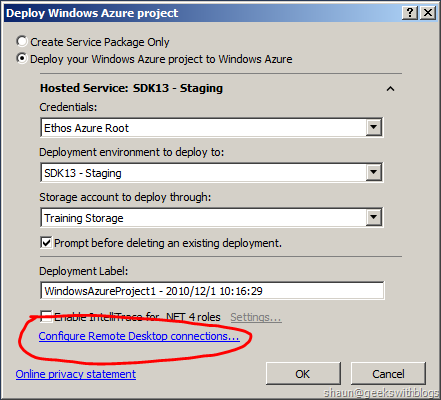
选中”Deploy your Windows Azure project to Windows Azure”单选按钮,提供证书,部署服务/槽、存储和标签等信息。
为了使用一键部署的特性,您必须将Management API证书上传至到您的Windows Azure帐户内,并在计算机上安装该证书。 您会在对话框下方发现有一个”Configure Remote Desktop connections”的连接。您需要通过该链接来开启远程桌面访问功能。
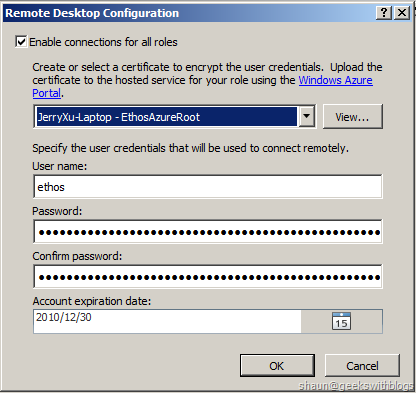
点击这该连接,我们将配置远程桌面访问的权限信息。配置过程有4个步骤:
- 证书:我们需要创建或选择一个证书文件来加密访问凭证。在这个例子中我将证书文件用于我的Management API。
- 用户名:访问虚拟机的远程桌面用户名。
- 密码:登录密码。
- 有效期限:登录凭证默认在1个月后过期,但我们可以修改该默认值。
在这之后我们单击OK按钮,返回发布对话
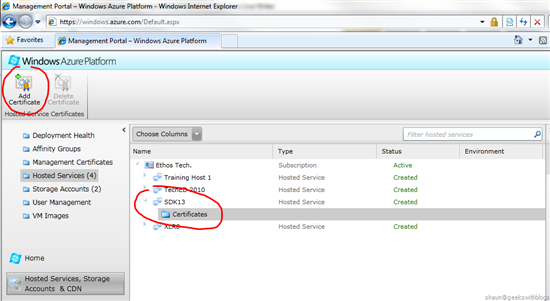
下一步访问新版Windows Azure门户,找到托管服务清单。创建一个新的托管服务并上传证书文件到该服务。用于访问Windows Azure虚拟机的用户名和密码必须在本地机器上加密,并在Windows Azure端以相同的证书文件进行解密。这就是我们为什么需要上传证书文件到Windows Azure上的原因了。 在左侧面板的”Hosted Services, Storage Accounts & CDN”中,创建一项新的托管服务,命名为”SDK13,然后点击”Certificates”。然后我们点击”Add Certificates”按钮。
选择本地证书文件和密码,将其安装至Windows Azure服务。

最后一步会返回到Visual Studio,点击发布对话框中的OK按钮。然后Visual Studio会将程序包,以及带有远程桌面设置的配置文件上传至Windows Azure。

远程桌面访问Windows Azure虚拟机
完成所有上述步骤后,让我们来回到新版Windows Azure开发门户。选择刚部署至Windows Azure的web role,在工具栏上我们可以看到有一名为”Remote Access”工具区。在该工具区,我们看到Enable复选框已经被勾上了,这意味着该web role已经开启了远程桌面访问功能。

如果想要修改连接凭证,我们可以直接点击Configure按钮,便可以更新用户名、密码、证书和有效期限。

选择web role下的实例节点,我们可以看到,我们可以点击Connect按钮来启动远程桌面访问。

点击该按钮后,我们会下载一个RDP文件被。这是一个远程桌面的配置文件, 可以用来访问我们的Windows Azure虚拟机。我们将其下载到本地,并运行。

输入先前的用户名和密码,点击OK按钮。

此时可能出现证书警告对话框。这是因为我们用来加密的证书并不是由可信赖的提供商签署的。此时选择OK。因为我们清楚知道该证书对我们来说是安全的。
最后,我们成功的以远程桌面访问Windows Azure虚拟机。

快速的浏览Windows Azure虚拟机概况
我们可以浏览一下我们的虚拟机。这里有3个磁盘可供我们使用:C、D、E。
- C盘: 储存本地资源、诊断信息等。
- D盘: 包含OS,IIS, .NET Frameworks等文件的系统磁盘。
- E盘: 存储我们的应用程序代码。

托管了服务的IIS。

Windows Azure虚拟机的IP配置。

总结
在这篇帖子中我讲解了Windows Azure 1.3版本SDK其中的一个新特性-远程桌面访问。我们可以按照每个服务来设置远程桌面访问权限,这样该服务下的每个实例都能被远程桌面访问。该特性让我 们能深入我们实例的虚拟机, 来查看实例内部信息,例如系统事件、IIS日志、系统信息等。
但是我们在修改系统设置时,应注意如下2:
- 1. 如果某个服务有超过一个的实例,我们就应该确保所有的虚拟机/实例有着相同的系统设置。否则, 由于实例间的不同设置会使负载均衡代理无法正常工作。
- 2. 当虚拟机中遇到了一些问题,需要被转移至另一个物理计算机时,我们需要对该新机器进行设置。
本文翻译自:http://geekswithblogs.net/shaunxu/archive/2010/12/03/remote-desktop-to-your-azure-virtual-machine.aspx
Windows Azure SDK 1.3 allows customers to connect to their VM’s on the cloud. Below is the step-by-step article to connect to VM’s via remote desktop.
1) Create simple cloud project with ASP.net role
2) In Visual Studio Solution Explorer, Right click on the Cloud Service Project and Click “Publish”, It will bring up screen similar to below. Now, Click on “Configure Remote Desktop Connections” as highlighted below
3) Select “Enable connections for all roles” checkbox, Create certificate or use existing certificate. This certificate will be used to encrypt the credentials
Note: Certificate created in this step can be found in Current User\personal store.
4) Configure Credentials, Expiry date as shown below
5) ServiceConfiguration.cscfg , ServiceDefinition.csdef looks similar to below. In case you would like to manually configure the settings, below highlighted settings should be configured to enable remote desktop connection.
ServiceConfiguration.cscfg
Note: You would need to specify the encrypted password if you are configuring AccountEncryptedPassword manually. Following this article to encrypt the password using PowerShell.
ServiceDefinition.csdef
Note: If you are configuring these settings manually, remember to add certificate to web role
6) Export the certificate created in step 3 to pfx format
a) Open certificate snap in for “My user account” (current user)
b) Navigate to Current User\Personal\Certificates
c) Right click on the certificate that we created in step 3
d) Choose All Tasks è Export è Choose Next
e) Choose options as shown in screen shots
7) Upload the certificate to the Windows Azure portal
8) Deploy the application to cloud either via portal or VS2010 Publish option
9) Once the deployment is successful, Go to Windows Azure portal
10) Click on Connect to create .RDP file , save it locally and open the rdp file by double clicking on it
11) When prompted for credentials, specify the credentials mentioned in step 4
Voila! Connected to the VM!