

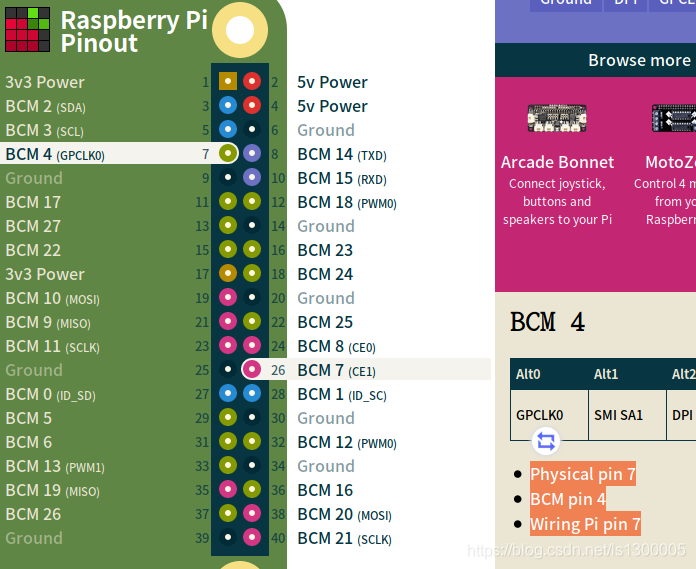
树莓派控制16路PWM输出的PCA9685模块 1.PCA9685 1.1简介 采用I2C通信,内置了PWM驱动器和一个时钟,不需要不断发送信号占用单片机资源 支持16路PWM输出,每路12位分辨率(4096级),在60Hz的更新率能够达到4us分辨率 内置25MHz晶振,可不连接外部晶振,也可以连接外部晶振,最大50MHz 分为控制电和驱动电两个电源,控制电支持2.3V-5.5V电压,最大耐压值5.5V,逻辑电平3.3V,驱动电支持5V-10V直流电压。 1.2引脚 引脚 功能 GND 接地 OE 空引脚 SCL I2C总线控制线 SDA I2C总线数据线 VCC 控制电压,2.3V-5.5V V+ 驱动电压,5V-10V V+是给外接设备供电的引脚,在驱动大功率舵机时候通常不使用V+,而是使用外接电源的两个端口,即下图我标出来的VCC,GND。
V+的电压是多少,舵机的电压就是多少。我使用的是SG90,工作电压为4.8V-6V,V+就应该在4.8V-6V。
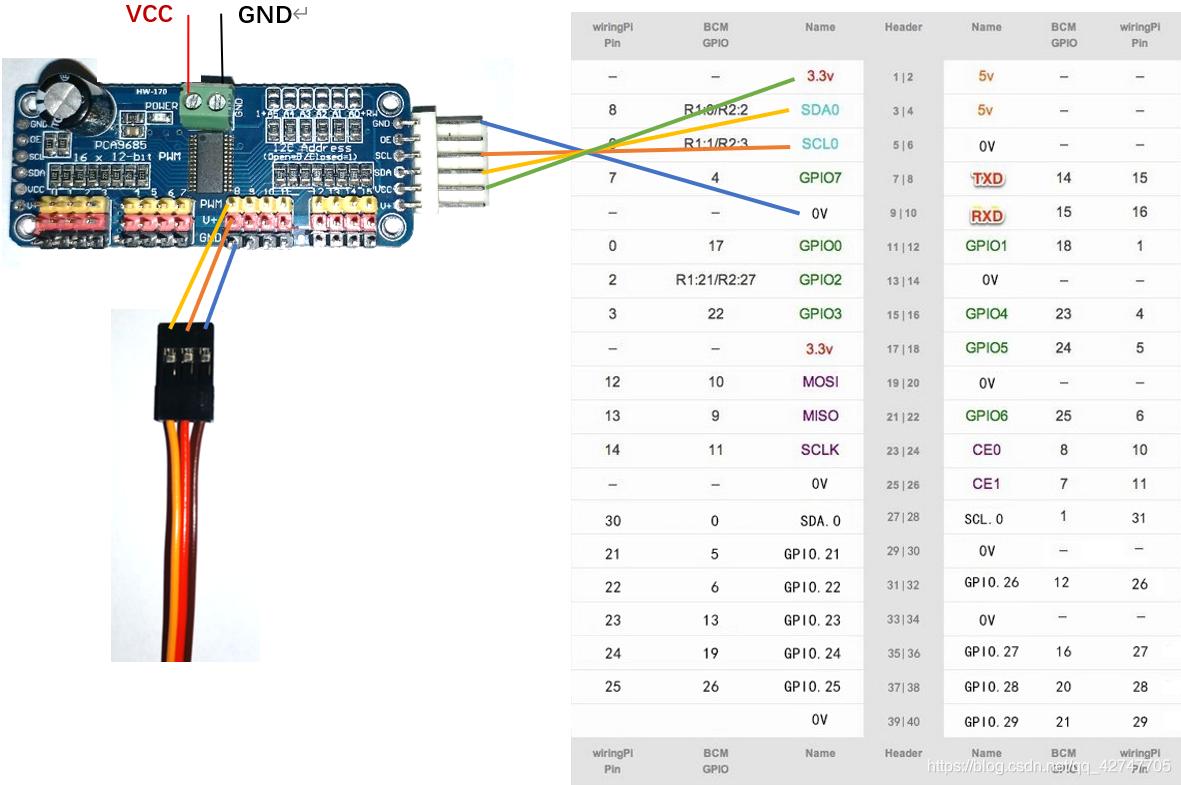
PCA9685连接树莓派和舵机
2.树莓派部分 烧录好系统,开机。 我使用的是ubuntu mate。 更新一下软件包。
sudo apt-get update sudo apt-get dist-upgrade
检查一下pip版本
pip -V
我更新过了,所以是20.0.2。 如果版本低了,更新一下。
sudo python -m pip install –upgrade pip
2.1打开IIC
ubuntu系统需要手动安装:http://archive.raspberrypi.org/debian/pool/main/r/raspi-config/raspi-config_20211111_all.deb
依赖包:sudo apt install lua5.1 libatopology2 libfftw3-single3 libsamplerate0 alsa-utils
sudo dpkg -i raspi-config_20200601_all.deb
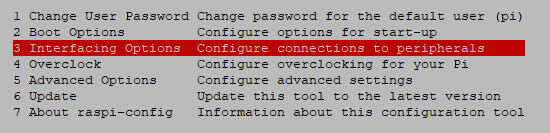
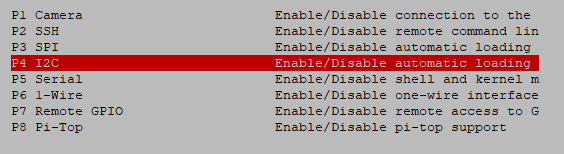


sudo raspi-config -> Interfacing Options -> I2C->enable
sudo raspi-config
Utilities
There is a set of command-line utility programs that can help get an I2C interface working. You can get them with the apt package manager.
sudo apt-get install -y i2c-tools
In particular, the i2cdetect program will probe all the addresses on a bus, and report whether any devices are present. Enter the following command in the command line. The -y flag will disable interactive mode so that you do not have to wait for confirmation. The 1 indicates that we are scanning for I2C devices on I2C bus 1 (e.g. i2c-1).
i2cdetect -y 1
You will get an output from your Raspberry Pi similar to the output below.
pi@raspberrypi:~/$ i2cdetect -y 1
     0  1  2  3  4  5  6  7  8  9  a  b  c  d  e  f
00:          -- -- -- -- -- -- -- -- -- -- -- -- --
10: -- -- -- -- -- -- -- -- -- -- -- -- -- -- -- --
20: -- -- -- -- -- -- -- -- -- -- -- -- -- -- -- --
30: -- -- -- -- -- -- -- -- -- -- -- -- -- -- -- --
40: -- -- -- -- -- -- -- -- -- -- -- -- -- -- -- --
50: -- -- -- -- -- -- -- -- -- -- -- -- -- -- -- --
60: 60 -- -- -- -- -- -- -- -- -- -- -- -- -- -- --
70: -- -- -- -- -- -- -- --
This map indicates that there is a peripheral at address 0x60. We can try to read and write its registers using the i2cget, i2cset and i2cdump commands.
A few comments:
The instructions provided by anvoice in this question were essential, but the actual dependencies are a few years out of date. So I suggest you try step #1 and read the dpkg output to tailor dependencies to your version of raspi-config.
It appears that raspi-config may not be necessary, but you might only need to add the dtparam=i2c_arm=on flag to /boot/config.txt (see the official docs). I haven’t tried (yet). If you want to try, sudo nano /boot/config.txt, add the flag on a new line, CTRL-X, confirm with Y, then start at step #6.
2.2安装adafruit 方法1 sudo pip3 install adafruit-pca9685
方法2 sudo apt-get install git build-essential python-dev cd ~ git clone https://github.com/adafruit/Adafruit_Python_PCA9685.git cd Adafruit_Python_PCA9685 sudo python3 setup.py install
方法2安装的在Adafruit_Python_PCA9685-master/examples下有个例程simpletest.py 方法一我没找到这个文件,找不到的可以去github里找。点这里 https://github.com/adafruit/Adafruit_Python_PCA9685/tree/master/examples

复制或下载,然后运行
python3 simpletest.py 可以看见舵机转动
我改过的代码
from future import division # python2使用
import time import Adafruit_PCA9685 # 调用PCA9685模块
pwm = Adafruit_PCA9685.PCA9685()
设置最大最小脉冲长度
servo_min = 90 # 4096的最小脉冲长度 servo_max = 640 # 4096的最大脉冲长度 servo_mid = 365 # 4096的中间脉冲长度
设置频率为60
pwm.set_pwm_freq(60) print(‘Moving servo on, press Ctrl-C to quit…’) while True: pwm.set_pwm(0, 0, servo_min) time.sleep(1) pwm.set_pwm(0, 0, servo_max) time.sleep(1) 运行就可以看见接在通道0上的舵机反复运动