

该死的,这很复杂,但多亏了你的解释和提示,我才成功地刷新了设备。 该指南 106 从 @rogerpueyo和说明 33 从 @araujorm 非常有帮助,比我的描述要好得多。
所需设备:
- MI 路由器 4A 千兆版(在板上他们印有“MI M43 R0101l。这是带有千兆的MI 路由器 4a,类似于 Mi Router 3G V2,但有“偷工减料”)。
- USB 转串口适配器,3.3 伏
- USB ch341a 闪存编程器,带抽筋电缆(我的成本 <= 5 美元,是在 aliexpress 上购买的 68)
- Linux 和 flashrom-tool 和 tftpd-hpa
- 谷歌驱动器中的图像 86不得使用此线程中提到的此处,它会覆盖您的 mac 地址。而是转储路由器的固件并编辑 bootdelay 的值。
硬件准备:
- 打开路由器
- 不要将电源线连接到路由器
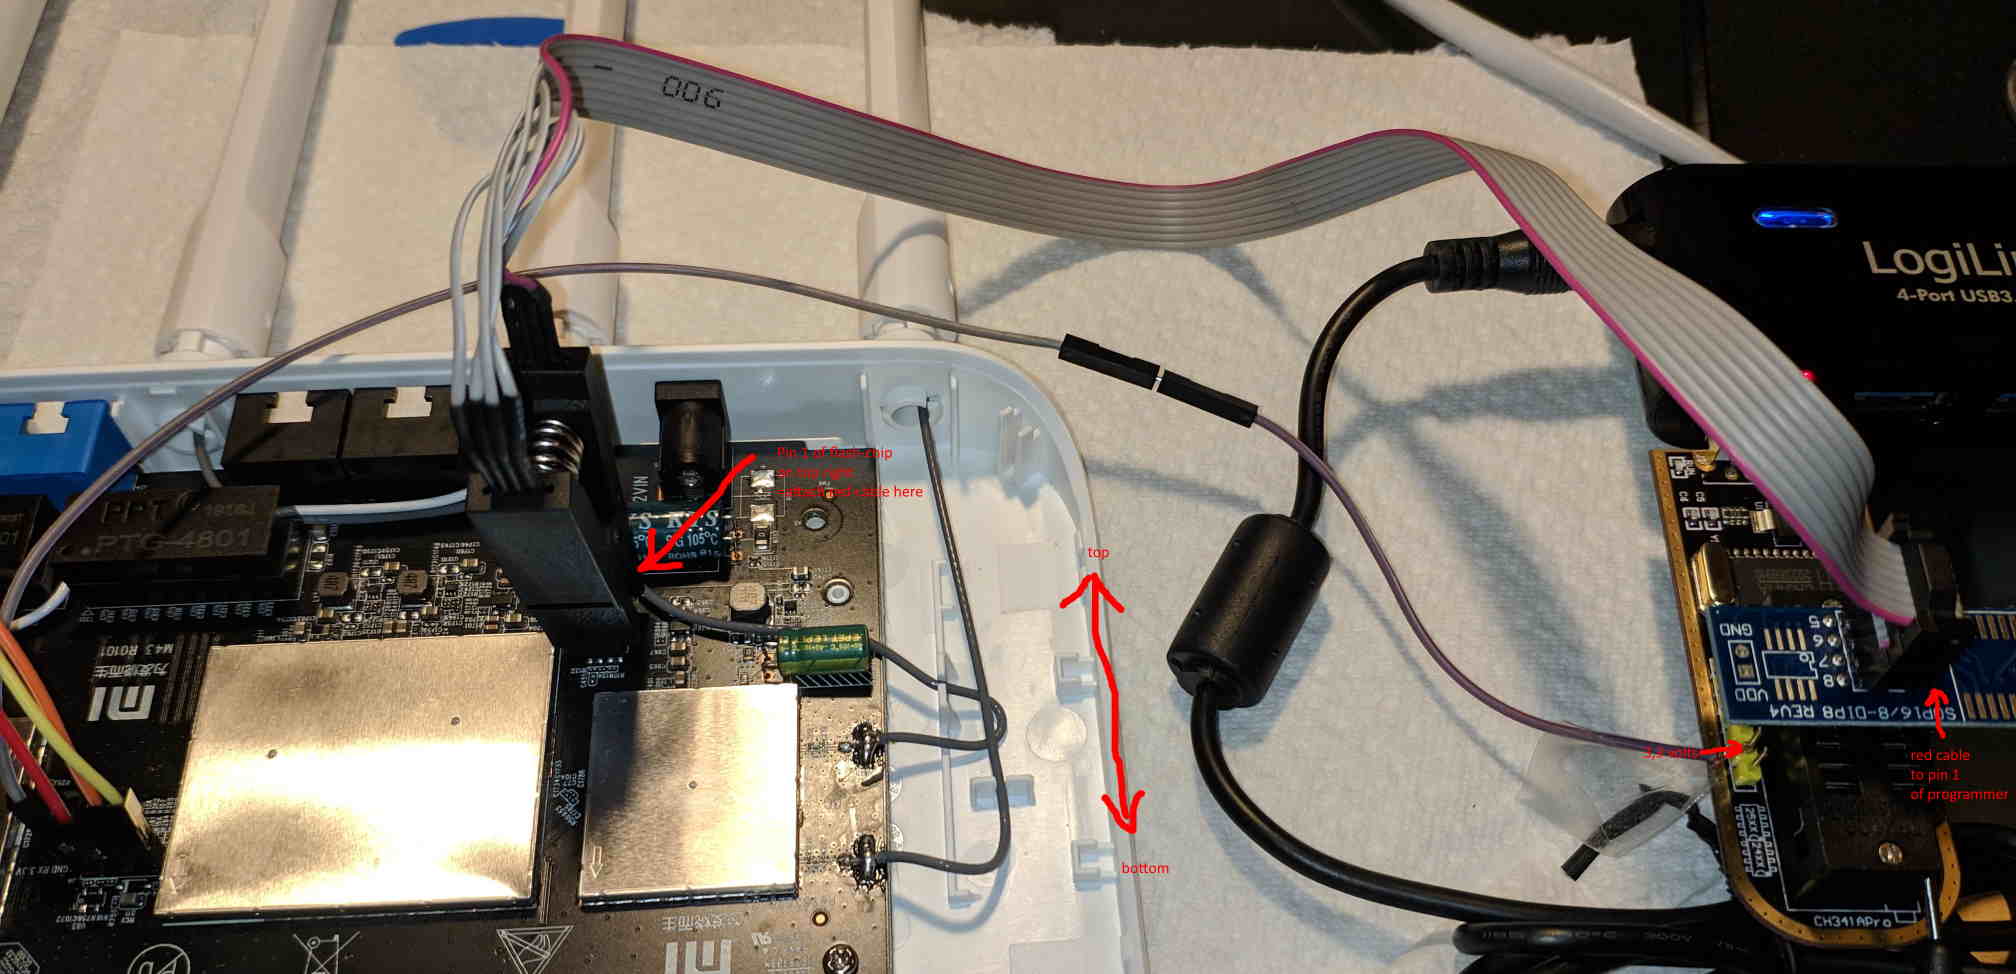
- 将 USB 转串行适配器连接到串行引脚孔。TX路由器到RX usb-adatper,RX路由器到TX usb-adapter,GND到GND。不要连接 3.3V,因为大多数 USB 串行适配器不能提供足够的电源,所以它保持空置状态。
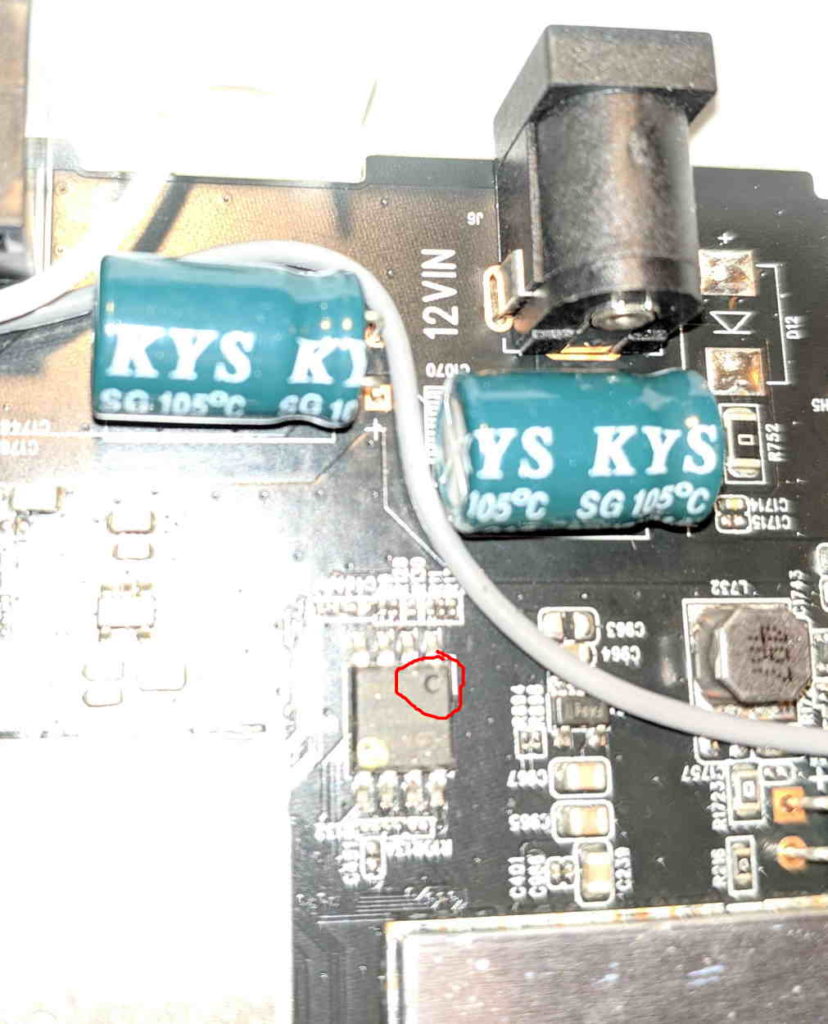
- 将夹子连接到闪存芯片。红线 (=pin1) 必须在右上方,这意味着靠近天线。闪存芯片有一个圆形凹口,用于标记引脚 1 – 不要将其与印在其上的黄色圆形标记混淆。在连接之前,我必须将它定位 5-10 次。
- 将夹线的另一端连接到 ch341a 闪光灯,并确保将红线连接到 pin1 插槽并使用 SPI/BIOS 插槽而不是 eeprom 插槽。
- ch341a 编程器没有额外的 3.3 伏馈电到必要的串行引脚旁边的路由器的 3.3v 针孔。您可以跳过此步骤。我连接了电缆,但没有必要。
从闪存中读取:在连接到编程器的 linux pc 上 运行
flashrom --programmer ch341a_spi -c "GD25Q128C" --read r4ga-orig.bin。 然后按照这篇文章中提到的修改转储的BIOS 106并更改引导延迟值。 不要简单地使用此线程中提供的 r3g-edited.bin,因为您将覆盖eth0、eth1、wlan0 和 wlan1 的mac 地址。
写入闪存:在连接到程序员的 linux pc 上
运行flashrom --programmer ch341a_spi -c "GD25Q128C" --write r3gc2-edited.bin。
闪烁大约需要 10 分钟。 如果您看到错误消息“找不到 EEPROM/闪存设备”。检查电缆连接。当连接正确时,我的 ch341a 适配器上的两个红灯都会亮起。 我不得不使用USB3-HUB为其提供足够的电源,编程器在USB2.0上无法正常工作。如果程序无法擦除闪存并开始探索不同的擦除方法,则您没有正确连接所有引脚。取下并重新连接夹子,然后再试一次。
成功闪烁后,断开抽筋/ch341a 适配器的连接。 路由器的引导加载程序现在将接受未经小米签名的固件映像。
准备好tftp-daemon(apt install tftpd-hpa),但是openwrt-rampis-mt7621-xiaomi_mir3g-v2-squashfs-sysupgrade-01-10-2019.bin 中的/var/lib/tftpboot
服务可写设置 /etc/default/tftpd-hpa
/etc/default/tftpd-hpa
TFTP_USERNAME=”nobody” TFTP_DIRECTORY=”/tftp_root” TFTP_ADDRESS=”0.0.0.0:69″ TFTP_OPTIONS=”–secure -c”
分配ip 192.168.31. 24 连接到您的 PC 并将 LAN 电缆连接到路由器。
为路由器通电,按住重置按钮并观察串行控制台。
您应该会看到提示Please choose the operation: 1: Load system code to SDRAM via TFTP. 2: Load system code then write to Flash via TFTP. 3: Boot system code via Flash (default). 4: Entr boot command line interface. 7: Load Boot Loader code then write to Flash via Serial. 9: Load Boot Loader code then write to Flash via TFTP.
选择 2 并按下或按住它。
确认 Y。
指定路由器的 IP 和您的 tftp 服务器(例如 192.138.31.1 = 路由器,192.168.31.100 = tftp)。输入 openwrt-sysupgrade-imagefile 的文件名。
2: System Load Linux Kernel then write to Flash via TFTP.
Warning!! Erase Linux in Flash then burn new one. Are you sure?(Y/N)
Please Input new ones /or Ctrl-C to discard
Input device IP (192.168.31.1) ==:192.168.31.1
Input server IP (192.168.31.2) ==:192.168.31.100
Input Linux Kernel filename () ==:openwrt-mir3g-v2.bin
NetTxPacket = 0x87FE52C0
KSEG1ADDR(NetTxPacket) = 0xA7FE52C0
NetLoop,call eth_halt !
NetLoop,call eth_init ! Trying Eth0 (10/100-M)
Waitting for RX_DMA_BUSY status Start… done
ETH_STATE_ACTIVE!! TFTP from server 192.168.31.100; our IP address is 192.168.31.1 Filename ‘openwrt-mir3g-v2.bin’.
TIMEOUT_COUNT=10,Load address: 0x80100000 Loading: T T Got ARP REPLY, set server/gtwy eth addr (18:db:f2:38:0a:18) Got it checksum bad ################################################################# ################################################################# #####################################checksum bad ############################ ################################################################# ################################################################# ################################################################# ################################################################# ################################################################# ################################################################# ################################################################# ################################################################# ################################################################# ################################################################# ################################################################# ################################################################# ################################################################# ################################################################# ################################################################# ################################################################# ################################################################# ################################################################# ################################################################# ################################################################# ################################################################# ############################ done Bytes transferred = 8127244 (7c030c hex) LoadAddr=80100000 NetBootFileXferSize= 007c030c Writing OS1 to 0x180000 raspi_erase_write: offs:180000, count:7c030c raspi_erase: offs:180000 len:7c0000 ……………………………………………………………………………………………………………………………………………………………………………………………… ……………………………………………………………………………………………………………. raspi_erase: offs:940000 len:10000 . . Done! Erasing SPI Flash… raspi_erase: offs:30000 len:10000 . Writing to SPI Flash… . done Booting System 1 Erasing SPI Flash… raspi_erase: offs:30000 len:10000 . Writing to SPI Flash… . done
Booting image at bc180000 …
Image Name: MIPS OpenWrt Linux-4.14.146 Image Type: MIPS Linux Kernel Image (lzma compressed) Data Size: 2015401 Bytes = 1.9 MB Load Address: 80001000 Entry Point: 80001000 Verifying Checksum … OK Uncompressing Kernel Image … OK Erasing SPI Flash… raspi_erase: offs:30000 len:10000 . Writing to SPI Flash… . done commandline uart_en=0 factory_mode=0 mem=128m root=/dev/mtdblock9 No initrd
Transferring control to Linux (at address 80001000) …
Giving linux memsize in MB, 128
Starting kernel …
路由器闪烁并重新启动进入 openwrt 并且可以在 192.168.1.1 上访问。 完毕。